
Part 1: API Configuration SOP
Set up essential APIs including proxy services, captcha solving, OpenAI integration, and Cloud API configuration to enable full SEO NEO functionality.
📋 Prerequisites
Before starting this SOP, ensure you have:
- ✅ SEO NEO installed and activated
- ✅ Admin access to SEO NEO settings
- ✅ Credit card or payment method for API services
- ✅ Valid email addresses for service registrations
🎯 Objectives
By completing this SOP, you will:
- Configure proxy services for IP rotation
- Set up captcha solving capabilities
- Integrate OpenAI for content generation
- Configure Cloud APIs for blog creation
- Test all API connections
🔧 Step-by-Step Configuration
Settings Overview
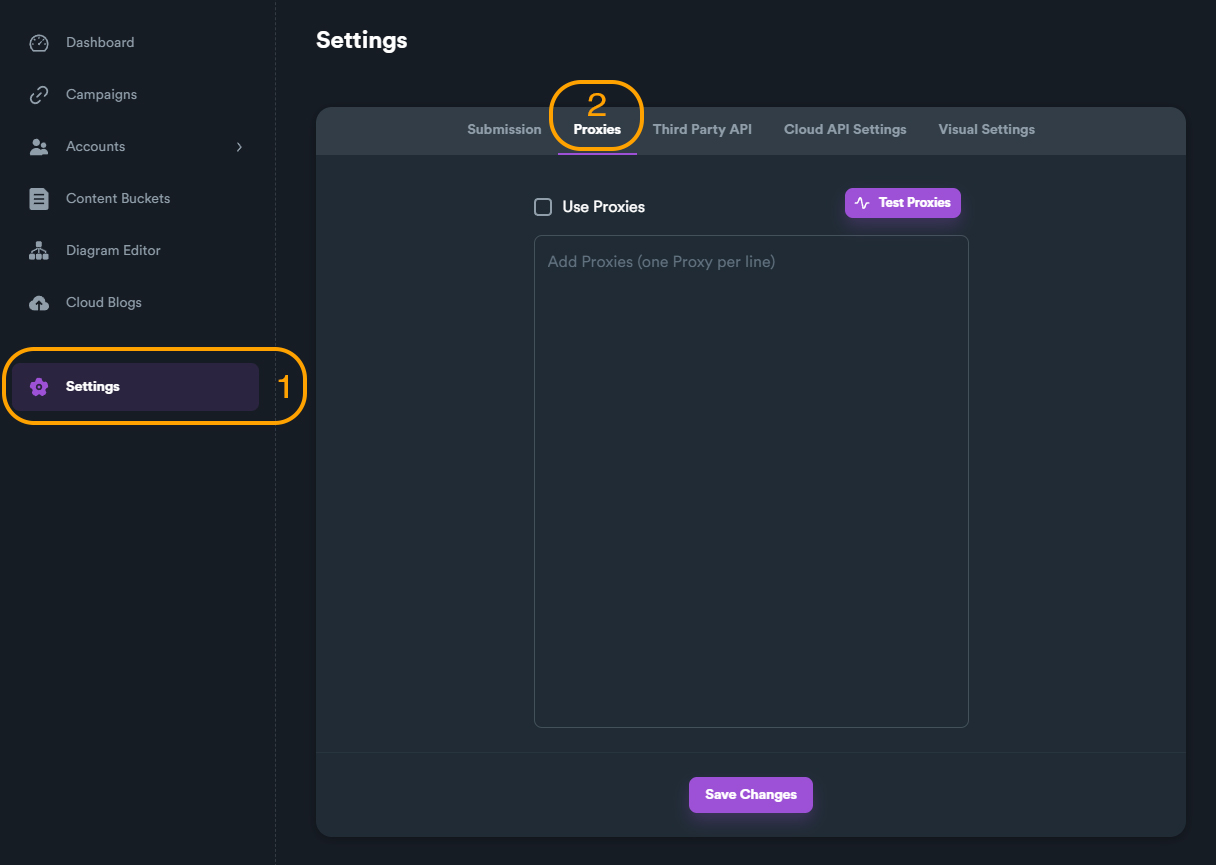
Step 1: Proxy Service Configuration
Proxies are essential for maintaining anonymity and avoiding rate limits during link building campaigns.
1.1 Choose a Proxy Provider
Recommended Providers:
- Bright Data (formerly Luminati) - Premium option
- SmartProxy - Good balance of price and quality
- ProxyEmpire - Budget-friendly option
- Residential Proxies - Best for high-value campaigns
1.2 Configure Proxy Settings
Navigate to Settings → Proxy Configuration
Enter your proxy credentials:
Proxy Type: [Residential/Datacenter]
Proxy Format: [username:password@host:port]
Rotation: [Sticky Session/Rotating]
Proxy Format Examples:
- HTTP:
username:password@proxy.provider.com:8080 - SOCKS5:
socks5://username:password@proxy.provider.com:1080
- HTTP:
Test Proxy Connection:
- Click Test Connection
- Verify successful connection message
- Check IP rotation is working
Pro Tip
Use residential proxies for high-authority sites and datacenter proxies for bulk operations. Mix both for optimal results.
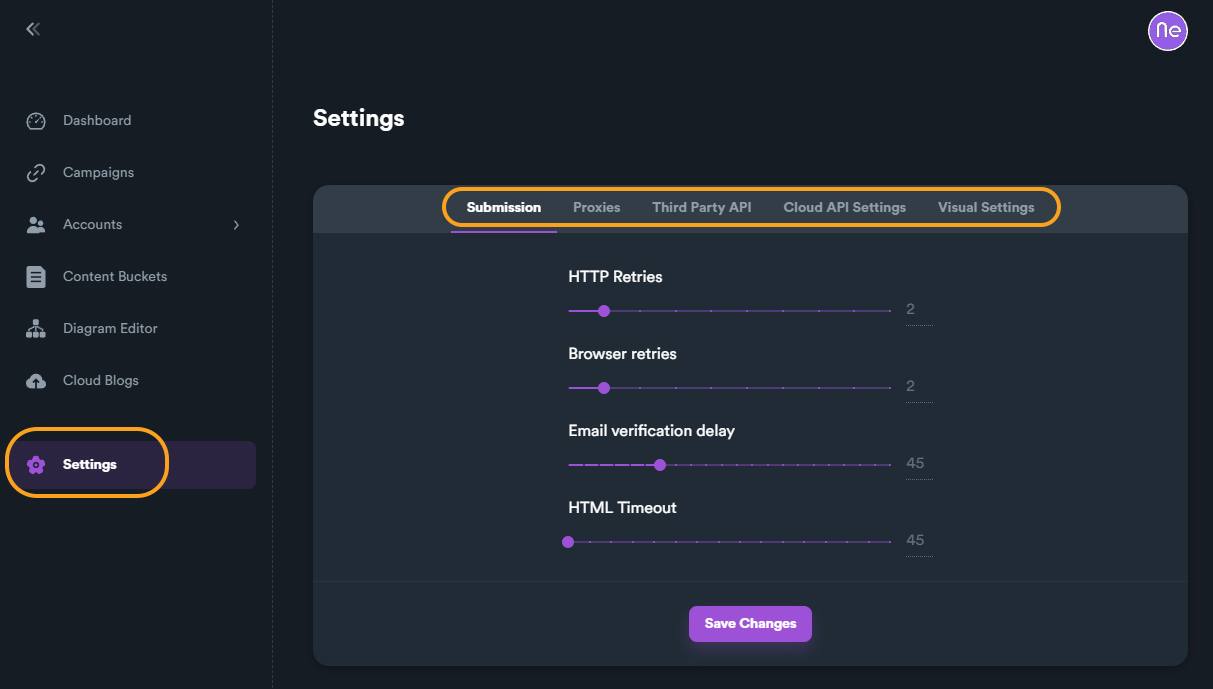
Step 2: Captcha Solving Service
Automated captcha solving is crucial for scaling your link building operations.
2.1 Select Captcha Service
Recommended Services:
- 2Captcha - Most reliable, good pricing
- Anti-Captcha - Fast solving times
- DeathByCaptcha - Premium accuracy
- CapMonster Cloud - AI-based solving
2.2 API Key Setup
- Register at your chosen captcha service
- Fund your account (minimum $10 recommended)
- Copy your API key from dashboard
- In SEO NEO, navigate to Settings → Captcha Services
- Enter your API key:
Service: [2Captcha/Anti-Captcha/etc]
API Key: [Your-API-Key-Here]
Thread Limit: 10
Timeout: 120 seconds
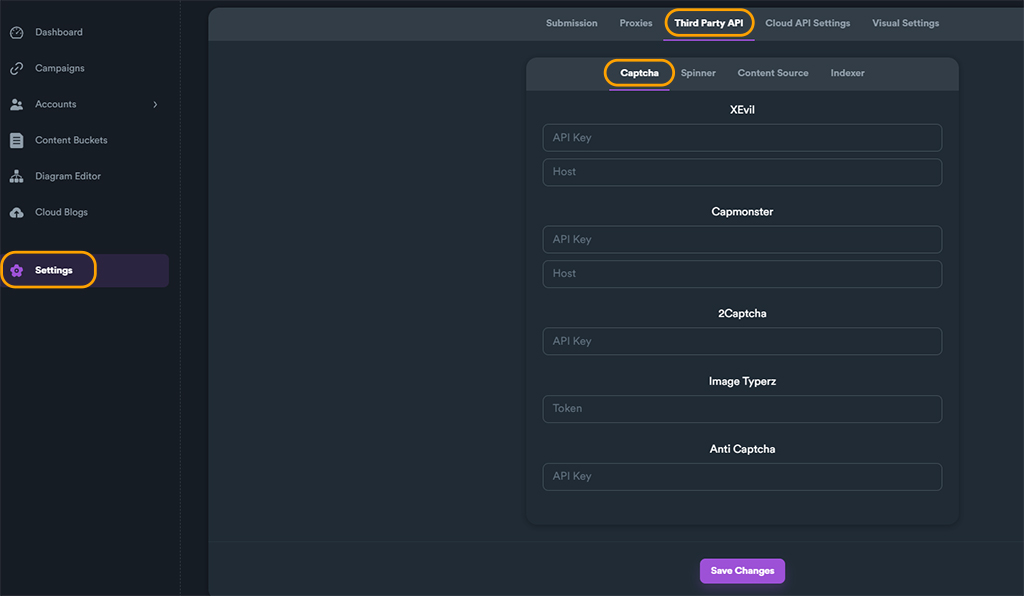
2.3 Configure Solving Parameters
Optimal Settings:
ReCaptcha v2: Enabled
ReCaptcha v3: Enabled (Score: 0.7)
hCaptcha: Enabled
Image Captcha: Enabled
Text Captcha: Enabled
Retry Failed: 3 attempts
Important
Monitor your captcha solving balance regularly. Set up auto-refill if available to avoid campaign interruptions.
Step 3: OpenAI Integration
OpenAI integration enables high-quality, AI-generated content for your campaigns.
3.1 OpenAI Account Setup
- Visit platform.openai.com
- Create account or sign in
- Navigate to API Keys section
- Click Create new secret key
- Copy and save your API key securely
3.2 Configure in SEO NEO
- Go to Settings → AI Configuration
- Enter OpenAI settings:
API Provider: OpenAI
API Key: sk-[your-key-here]
Model: gpt-3.5-turbo (recommended for balance)
Max Tokens: 2000
Temperature: 0.7
3.3 Content Generation Settings
Recommended Parameters:
Content Type: Article
Tone: Professional/Conversational
Length: 500-1000 words
Include Keywords: Yes
Keyword Density: 1-2%
Add Related Terms: Yes
3.4 Test Content Generation
- Click Test Generation
- Enter sample topic: "Best plumber in [city]"
- Review generated content quality
- Adjust parameters if needed
Cost Management
GPT-3.5-turbo offers best value. For premium content, use GPT-4 selectively. Monitor usage to control costs.
Step 4: Cloud API Configuration
Cloud APIs enable automated blog creation across multiple platforms.
4.1 Supported Cloud Platforms
Available Integrations:
- Blogger (Google)
- WordPress.com
- Tumblr
- Weebly
- Medium (limited)
4.2 Blogger API Setup
- Visit Google Cloud Console
- Create new project or select existing
- Enable Blogger API v3
- Create credentials:
- Type: OAuth 2.0 Client ID
- Application type: Desktop app
- Download credentials JSON file
4.3 Configure in SEO NEO
Navigate to Settings → Cloud Blogs
Import credentials:
Platform: Blogger
Auth Type: OAuth 2.0
Credentials: [Upload JSON file]
Default Labels: seo, [niche]
Post Status: Published
Authorize Access:
- Click Authorize
- Complete OAuth flow
- Verify "Connected" status
4.4 WordPress.com API
- Visit developer.wordpress.com
- Create new application
- Copy Client ID and Secret
- Configure in SEO NEO:
Platform: WordPress.com
Client ID: [your-client-id]
Client Secret: [your-secret]
Redirect URI: http://localhost:8080
Step 5: API Testing & Validation
5.1 Comprehensive Testing
Run through this checklist to ensure all APIs are working:
Proxy Testing:
- [ ] Single proxy connection test
- [ ] Rotation verification (5 requests)
- [ ] Geographic location check
- [ ] Speed test (< 3 seconds)
Captcha Testing:
- [ ] ReCaptcha v2 solve test
- [ ] Image captcha solve test
- [ ] Balance check API call
- [ ] Error handling test
OpenAI Testing:
- [ ] Generate test article
- [ ] Check content quality
- [ ] Verify keyword inclusion
- [ ] Test rate limiting
Cloud API Testing:
- [ ] Create test blog post
- [ ] Update test post
- [ ] Delete test post
- [ ] List blogs verification
5.2 Troubleshooting Common Issues
Proxy Connection Errors:
- Verify credentials are correct
- Check firewall/antivirus settings
- Test proxy in browser first
- Contact provider support
Captcha Solving Failures:
- Ensure sufficient balance
- Check API key validity
- Verify service status page
- Adjust timeout settings
OpenAI Errors:
- Verify API key is active
- Check usage limits
- Monitor rate limiting
- Review billing status
Cloud API Issues:
- Re-authorize OAuth tokens
- Check API quotas
- Verify blog permissions
- Review platform changes
📊 Configuration Checklist
Use this checklist to ensure complete setup:
Essential APIs
- [ ] Proxy service configured and tested
- [ ] Captcha solving active with balance
- [ ] OpenAI integrated and generating content
- [ ] At least one cloud platform connected
Recommended Settings
- [ ] Proxy rotation enabled
- [ ] Captcha retry set to 3
- [ ] OpenAI temperature at 0.7
- [ ] Cloud posts set to publish
Performance Optimization
- [ ] Thread limits configured
- [ ] Timeouts adjusted
- [ ] Rate limits respected
- [ ] Error logging enabled
🎯 Best Practices
API Key Security
- Never share API keys publicly
- Rotate keys every 90 days
- Use separate keys for testing/production
- Monitor usage for anomalies
Cost Management
- Set daily limits where possible
- Use webhooks for balance alerts
- Track ROI per API service
- Optimize usage patterns
Performance Tips
- Cache responses when appropriate
- Batch requests for efficiency
- Handle errors gracefully
- Log all API interactions
📈 Expected Outcomes
After completing this SOP, you should have:
- ✅ All APIs configured and tested
- ✅ Ability to rotate IPs automatically
- ✅ Automated captcha solving capability
- ✅ AI content generation ready
- ✅ Cloud blog creation enabled
🚀 Next Steps
With APIs configured, proceed to:
- Part 2: GBP & Keyword Setup - Configure Google Business Profile
- Part 3: Content Generation - Master AI content creation
- Part 4: Campaign Organization - Set up buckets and folders
💡 Pro Tips
API Management
Create a spreadsheet to track all your API keys, expiration dates, and monthly costs. This helps maintain organization as you scale.
Security Note
Always use environment variables or secure key management systems in production. Never hardcode API keys in configuration files.
🆘 Troubleshooting Resources
- Proxy Issues: Check provider status page and documentation
- Captcha Problems: Visit service dashboard for solver statistics
- OpenAI Errors: Review OpenAI API documentation
- Cloud API Help: Consult platform-specific developer documentation
✅ Congratulations! You've completed Part 1 of the SEO NEO SOPs. Your API infrastructure is now ready for advanced link building campaigns.